Need Help?

Facing hurdles in design or sketching? As a student, do you grapple with balancing schoolwork and creative pursuits? This blog provides in-depth, tailored advice, directly tackling issues in design, sketching, and academic management. It's a place where you may find the necessary support and guidance to overcome these challenges. (Copyright © 2007-2024 Daniel Lim) Feel free to share the topics you're eager to explore in this blog. Additionally, if my content has inspired or aided you, I'd love to hear about it. Your feedback is invaluable.

25 January 2013

Finding Design Opportunities 'On-Location' and Using 'On-Location Photographs'

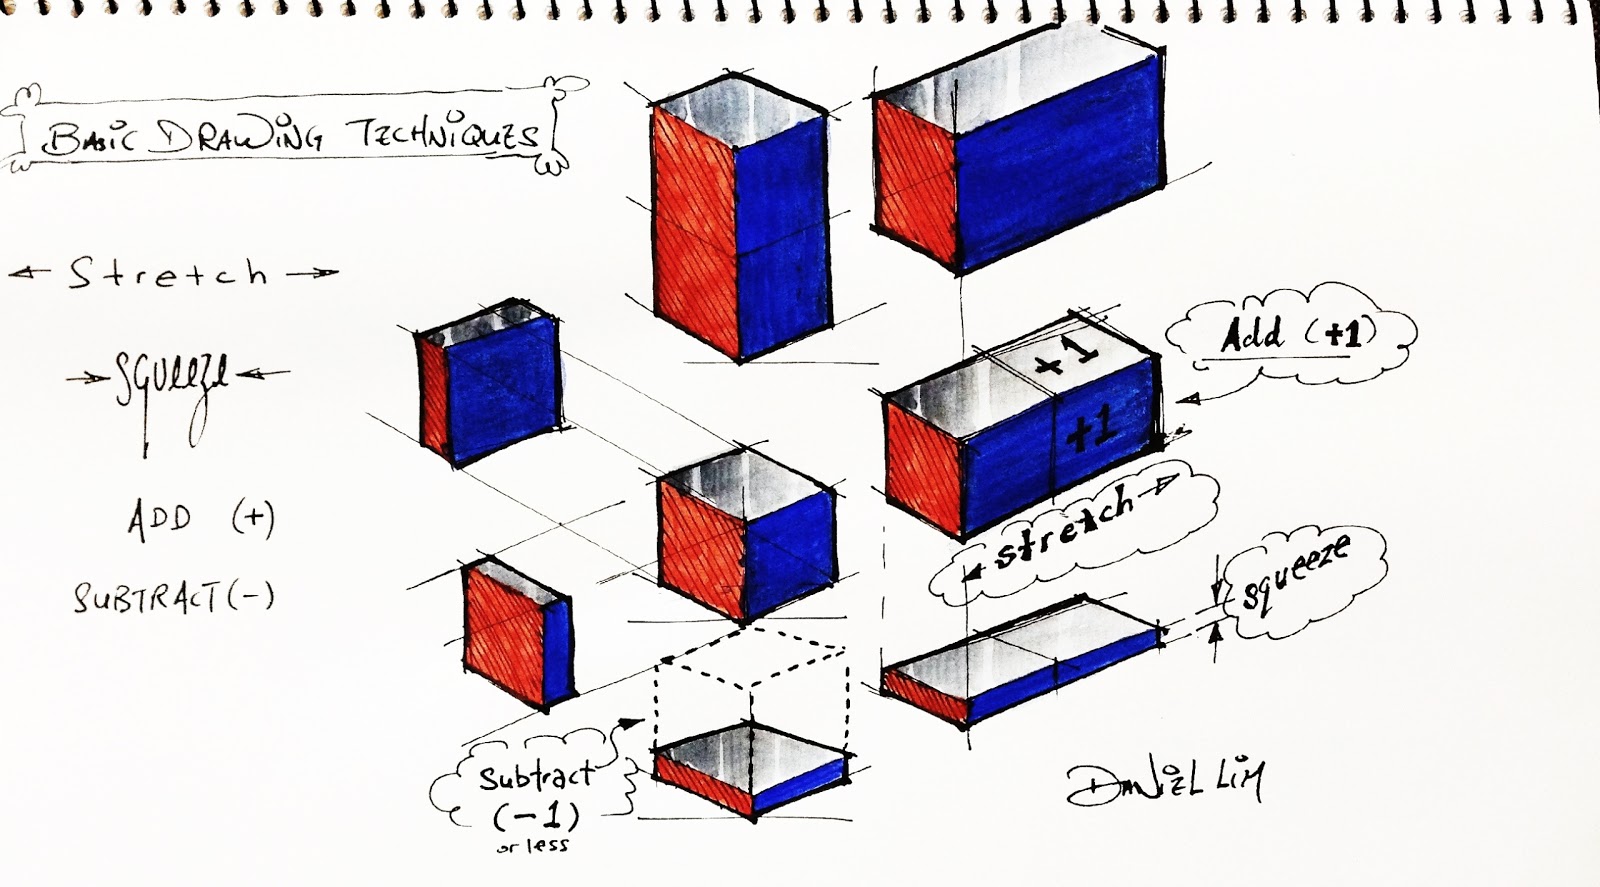
Finding Design Opportunities using 'photographs' and 'observations' on-site are pretty similar where you use your eyes and 'observe' what you see and use your mind to make sense of what is happening on the ground.
Record your observations in detail using more photographs, various forms of illustrations and annotations. The difference is, the former you can do it at the comfort of your home, and the latter, you do it, well, ... on-location!
----------------------------------------------------------------------------------

  Introduction
Using on-location photographs are useful strategies to identify genuine needs and design opportunities
Firstly because the source - the photographs -  came from a real location.
And secondly, the activities happening and the people involved in them are also genuine. They are happening in the real world in real time


Nothing gets closer than experiencing problems first hand. No drama. 

The best sources of information gathered from researches are from primary researches
Using a photograph that you take on your own is as close as it gets to primary research.


Fig. 1: A (Fictional) Sketch showing People in a Satay Club and the Activities Around
----------------------------------------------------------------------------------
  
STUDENT: "I have the photograph(s) now. What do I do with it?" (see Fig. 1, 2 or 3)

Step 1: A General 'Scan' of the Environement
Cover every corner of the photograph or the chosen location, stop and observe (in detail) at the activities that is going on. Identify objects and products that people interact with. Identify the Target Audiences (Targer User or Target Group) as you go along. Anaysing activities with the Target Audiences in mind is more useful than with a generalized group of people.
  • You can begin anywhere in the photograph or the scene, or
  • You can select a point and go clockwise or anti-clockwise, or
  • You can begin by imagining how you would start walking as if you are in the picture from left to right or vice versa.
Look at what is in front of you and ask, 'What do I see?" then ask more questions (keeping the theme in mind) to 'dig' out more information from the scene. You can use  '5W1H' to help you with this activity.

For example, you ask:
  • "Who are the people there?"
  • "Where are they going?"
  • "What are they doing?"
  • "Why are they doing ....?"
  • "What (products) are they using to do...?"
  • "What problems might they be facing?"
  • "Why do they have this problem / inconvenience / frustration?"
  • "What could have caused the problem / inconvenience / frustration?" , etc.
  • "How does this or that work?", etc.
Or you may have spotted someone's expression and then ask,
  • "Why does he/she look quite frustrated?"
  • "What happened actually?", etc.
The number and the type questions you can ask is limitless. One question will lead to the other as you try to dig out what is happening at that moment. The more questions you can generate to grill the activities in the photograph or the scene, the more information and insight you will get. 
 
Step 2: Use P.I.E.S. to Identify and Make a list of Needs

  • Begin with the Physical, Intellectual, Emotional and Social  ('P.I.E.S.') Needs analysis tool to make a list and categorize the different type of NEEDs on the activities that is going on in the scene.
  • Start from identifying Physical Needs, follow on to Intellectual Needs, Emotional Needs and finally Social needs that either present or required based on your observations and interpretation of the photograph or on the scene.
  • From identifying and recording the various types of NEEDsDesign Opportunities can be identified.

Step 3: Use  'Activity Mapping' to Study Processes and identify Objects for Improvements

To start using the 'Activity Mapping' tool, you should first select an identified NEED area from Step 3.

For example, your target group are the Elderlies and you target location is Home. There are so many areas around the home. You may choose to focus on the Kitchen.

There are so many things that can happen in the kitchen and you may have identified some 'physical needs' related to activities happening in the kitchen. You might choose to focus on one of activities which happens to be 'pouring a cup of water' from a kettle in the kitchen.

Due to aging and poorer eyesight with less agile hand-eye coordination, you find there was frequent spillage of water on the table. So this is a 'Physical Need' area that needs to pay attention to.

You can then use 'Activity Mapping' to study how an elderly would interact with the cup and kettle and how he pours water out of it into the cup.
  • The Activity Mapping is an excellent tool for working out processes and procedures, and also for identifying Products in use. Which in turn is excellent for identifying potential product improvements.

Step 4: Identify the Root Causes
  • If you do follow faithfully from Step 1 to 3, I am sure you will by now gathered quite a bit of investigations and insights about what has gone on within the environment concerned. 
  • You will also be loaded with quite a bit of identified Design Opportunities after engaging 5W1H, the P.I.E.S analysis & the Activity Mapping  tool to identify NEED areas and the products involved.
However, not every problem or design opportunities you have identified are good for solving. Design Opportunities may refer to all identified 

a) problems or potential problems to solve,
b) areas for product for improvements,
c) design challenge for an alternative or another clever idea, or
d) opportunity for an invention.
  • In reality, some 'problems' you identified may not even be problems as it seems! They are in your potential design opportunity list because of your 'assumptions' and 'good guesses' that they are problems. 
  • Next, you should be concerned about finding the root causes of those 'problems' you have identified to making sure your design opportunity is really worth spending the next few months solving and subsequently working out a solution.
  • To 'find the root cause', you'll have to engage the 'Five Whys' technique to test your assumptions and to get to the root cause(s) of those so-called 'problems' you have identified. 
  • The ultimate 'Five Whys' questioning technique is almost a full-proof litmus test to reveal the real problems from your initial assumptions and from those that were thought to be problems.
  • By the end of this step you should have at least 3-5 confident potential Design Opportunities for selection.
  • Even if you end up with 1 or 2 design opportunities it is fine. Because you will be very sure you have found genuine needs to solve.
Step 5: Existing Product Research and Product Analysis


Identifying the root cause of the problem in Step 4 is important. An equally critical step next is to do an Existing Product Research to study existing products and solutions that may have already been designed for the 'problems' you identified.

  • Existing product research is probably the second most important step after the Five Whys
  • Even if you have found the root cause of the problem and that may potentially be the ideal design opportunity, there is still a possibility that you might not be aware of existing solutions that have already been designed. You do not want to end up creating stuffs that has already existed. Do you?
  • Research and study all existing products that are directly or indirectly related to the problem you have identified.
  • Understand and compare their functionalities.
  • Seek to understand how and why they are designed they way they are and what problems do they solve.
  • If you discovered that solutions for the problem already existed, you can still transform that into a design challenge to design and create a better one. 
  • But before you do that, you got to study every possible existing solution in the market.
  • Do Product Analysis on them to identify all the features and functionalities, the good and the bad points and their 'hidden' potentials.
  • The P.M.I. technique can be used here.
  • 'Hidden' potentials refer to possible 'functionalities' that the products could have done to cater to the problem better but is have not yet realized as a designed feature in the existing solutions you have studied. If you find 'hidden' potentials they are probably the most valuable Design Opportunities you can ever find.

Step 6: Selecting Design Opportunities using 'Benefits' as Criterion for Selection
  • Finally we arrived here. You've got a few Design Opportunites now. How do you go about selecting the best one for your coursework?
  • One way is to make a list of 'benefits' for each one of them. 
  • Assuming if a solution is found, what are the benefits and who benefits. etc. 
  • Then compare the benefits and select the one that benefits the most people.
  • In other words, you want to compare the 'catchment area' of the benefits. Does this solution only benefit me? Him or Her? Or does it benefit a wider group of people? A family? A society or community? The neighbourhood? The nation? Or internationally?
  • The Design Opportunity that has the widest 'catchment area' should be the winner.
  • But also bear in mind time, ability and technological feasibility. That means even if you choose the most promising one, are you able to design and make it with your current ability, knowledge and time, and using what is available in the school to realize your product solution?
----------------------------------------------------------------------------------
Closure... more examples...
Fig. 2: A (Fictional) Sketch showing Tourists in a Hotel and the Activities Around
 
Fig. 3: A (Fictional) Sketch showing a Bell Boy Moving Luggages
All figures 1, 2 and 3 can be used as practice for the six steps described in this post.
----------------------------------------------------------------------------------
Now go and plan where to go for your observations or to gather photographs for identifying Design Opportunities.
----------------------------------------------------------------------------------

24 January 2013

Drawing Basics - Isometric Drawing - Practice

Drawing Basics - Isometric Drawing -
4-Parts Practice Tutorial

----------------------------------------------------------------------------------------
Fig. 1: Types of Drawing Techniques

Introduction 

Fig. 1 shows a variety of drawing techniques you can find or use in most sketches or drawings. Everyone of them has its own role and function to play in an art work.

In this practice, we'll be concentrating only on the ISOMETRIC drawing technique.

A 'shape' is a two-dimensional (2-D) drawing. A 'shape' has an 'area'. Not a 'volume'. A triangle, a square, an oblong, a rectangle, an octagon, etc. are all examples of geometrical shapes. 

A 'shape' can also be 'organic'. An 'organic shape' cannot be described using a geometrical term like a 'square'. They are actually hybrids of many shapes joined together and sort of 'blended' using curves or lines to make up a final 'shape'. 

An example on how different geometrical shapes can be combined to form 'organic' shapes can be found here.

A three-dimensional (3-D) object is called a 'form'. A 'form' is an area with a third dimension - the thickness. Similar to 'shapes', a 'form' can both be 'geometrical' or 'organic', or a combination of both. 

A short video showing the difference between a 'shape' and a 'form' can be found here.


NOTE: The tutorial that follows assumes that the student is already able to construct an Isometric Block.
----------------------------------------------------------------------------------------

Part 1: BASICS
Stretch / Squeeze / Add / Subtract


Fig. 2: Basic Drawing Technique (Part 1)

Fig. 2 shows the cube being transformed longer by adding more cubes or shorter by making cube 'thinner'. If you take away the lines that separate two or more cubes, you get a rectangular block! 

Steps:
  1. Begin by drawing a cube, 30mm each side, in the middle of the page.
  2. In the adjacent blank spaces in your sketchbook, draw another cube and make this 'longer' by adding another cube beside it. In a way it looks like you are 'stretching' the cube longer. You can add it from the front, back, on the left or the right hand side. Add more cubes in every direction (Up, Down, Left, Right) to make rectangular blocks of various lengths.
  3. Next, it is time to make your cube 'thin' by 'squeezing' it. Draw in every direction thin blocks. Draw long and thin blocks by adding another thin block beside it. Draw a various lengths of thin blocks in every direction. By making a block thinner than a cube, you are in a way 'subtracting' from the original size.
  4. Use your creativity to drawing more variety of blocks by stretching, squeezing, adding and subtracting a cube.
----------------------------------------------------------------------------------------


Part 2: BASICS
Stretch / Squeeze / Add / Subtract / Enlarge / Minimize / Combine & Creative Combinations

Fig. 3: Basic Drawing Technique (Part 2)

Fig. 3 shows an extension of Part 1 by not only adding or subtracting more cubes, but by combining two or more cubes together you make larger objects in a variety of forms. Similarly, by deliberately leaving out some cubes, you create a 'hole' or a 'hollow'. 

Steps:
  1. Begin by drawing a cube, 30mm each side, in the middle of the page.
  2. Draw your next cube larger. You can make your cube larger by adding more cubes surrounding a smaller one. Draw a variety of larger cubes of different sizes.
  3. Draw a group of cubes and deliberately 'miss out' one of them. When you created a 'space' by deliberately leaving some parts out, you just 'subtracted' a portion of it from the original mass.
  4. Use your creativity to drawing more variety of blocks by enlarging, minimizingstretchingsqueezingadding and subtracting a cube. Combine them to make more odd forms.
----------------------------------------------------------------------------------------


Part 3: INTERMEDIATE
Pyramids / Non-Isometric 'Cut' Surfaces / Through Holes / Recessed Shapes / Creative Combinations


 Fig. 4: Intermediate Drawing Technique (Part 3): Creative Combinations

Fig. 4 shows more advanced use of the techniques shown in Parts 1 & 2 and making use of them to create more complicated forms. Shapes can be used on the surface of a block to build a new form and when they are 'pushed' into the block, they create a through hole of any shape.

Note:
Notice the surfaces that are not colored? Do you know whey they are neither colored red nor blue, or even shaded grey like the top?

Those surfaces are called non-isometric surfaces. They do not belong to the rules of an Isometric Drawing. 

These slopes can be created accurately by first drawing a cube or a block, and then  'crated' using guide lines to show where the slope should start and end. If you tried drawing those non-isometric slopes or surfaces without first using an isometric block, it will be close to impossible to get a decent looking object.


Steps:
  1. Begin by drawing a cube, 30mm each side, in the middle of the page. Note: In Fig.4 I drew it at the top left hand corner.
  2. To create a PYRAMID is simple. If you can draw a cube in seconds, the pyramid will be out no slower than you can draw your cube.
  3. Here is how: You must locate the centre of the square at the top of the cube. That makes the 'tip' or the 'apex' of the pyramid. There are two ways you can do that. First method, you split the square into quarter smaller squares by drawing a 'cross'. Each line in the middle parallel to the edge of the square. Where the lines intersect, that is the middle point or apex of the pyramid. Second method, you draw two intersecting diagonal lines starting from the furthest four corners of the square. Where the lines intersect, that is the same middle point or apex of the pyramid.
  4. Next, you locate three points at the base of the pyramid where the 'tip' or 'apex' of the pyramid will join to make the edge of the sloping pyramid. 
  5. Note that since a pyramid has a square base, there must be a forth point. So yes, the fourth point is still there, but because the forth point will be at the back of the pyramid, and say we assumed the pyramid is opaque, we don't see it it from the front. So it is not necessary to show the back. However you can still use 'hidden' lines to show that it is there. But I am not going to talk about hidden lines here. 
  6. You should notice by now if you move the top 'point' of the pyramid anywhere else on the paper and join the three point bases to the 'point' you can draw a variety of 'funny' pyramids that are slanted. If you place the 'point' up high, you get a really 'tallpyramid. If you place the 'point' close to the ground, you get a 'stubby' pyramid. If you place the 'point' to the left or the right', the pyramid now looks like the "Leaning Tower of 'Pyramid' Pisa" which is kind of funny.
  7. Next 'Cut Surfaces'. A very quick recap: By now you should have read about non-isometric surfaces. The side walls of the pyramid are all non-isometric. But we can draw them accurately by placing a reference point. Recall point 3
  8. So for any 'cut-surfaces' that are non-isometric, we can do the same by drawing guidelines to show where the starting point of the 'cut' and where the 'surface-slope' will end.
  9. Begin at the top of a block. Draw a line to mark out a 'triangular' shape at a corner of the block. I drew it at the corner nearest to me. Next, you can decide where the 'slope' shall end. I picked a point that is touching the ground. You can choose a point anywhere along the vertical line.
  10. After you have located your 'point', you'll then locate the two ends from the first lines you drew in step 9, and join them to the 'point' at the bottom. Give it a light shade or hatch to show that there is a 'sloped' surface. And there you go. You just created a non-isometric 'cut-surface' on an isometric block! Isn't that painfully simple?
  11. Finally, creating 'through holes' using various shapes. Fortunately, drawing holes of any shape through a block is also very simple.
  12. Firstly, draw your isometric guide lines on the chosen surface of your block so that you can sketch your chosen shape on it. 
  13. Take the cube with a square hole example at the bottom left in Fig. 4. I have chosen the vertical surface on the left. Secondly, begin by drawing four lines offsetting from the four edges of the square. You still have an isometric square shape. You may end up with a square, or a rectangle, whatever. It does not matter. Mine is a smaller isometric square shape residing somewhere on the top left of the surface. See that?
  14. Finally, once you draw the shape on the surface, it is time to 'push' the shape 'inwards' INTO the block to create a 'hole'. Exciting isn't it? But how do we do it? Which line should we draw to create that illusion of a square hole? 
  15. You are just ONE line behind. Yes. Just ONE.
  16. If you use the example I show you, you'll notice there is only ONE more line to complete the 'through hole'. But how do you know which 'point' to pick to draw that final line?
  17. You'll need a little imagination here. Imagine, if there really was a square hole, and you've already drawn the 'square' on the vertical surface. And you are now looking at it from where you are. Where would the visible line that represents the edge of an internal square be? It should be at the back of the square. Once you locate the point, draw the final line 'in' the square to complete your very first 'through (square) hole'!
  18. Other variations of 'through holes' are 'recesses'. That means the 'holes' do not go through the block from one end to the other. Well they have flat 'bases' or 'bottoms'. 
  19. The example on the bottom right in Fig. 4 shows a pretty complex combo of randomly modified collection of blocks. Two of the 'holes' are examples of recesses. Can you spot them? Clue: They are rectangular 'recesses'.
  20. Make use of all possible combination you learned above to create beautiful block forms.
----------------------------------------------------------------------------------------


Part 4: Advanced

Elipse (Isometric Circles), Cones, Application of Circles and Arcs on Isometric Surfaces and Edges


Fig. 5: Advanced Drawing Technique (Part 3): Creative Combinations

Most products or objects that we see in our everyday lives are not simply made up of blocks. Otherwise it will be a very boring world. 

We learned from Parts 1-4 , starting from the very basic isometric cubes and blocks to more complicated modifications, to create complex forms like combining blocks, and subtracting parts from them. 

Part 4 serves to complete what we have learned so far and to bring us another step closer to drawing real world objects as they are. Round objects and curved surfaces makes up a great deal of all the shapes and forms around us. Not every thing are block and triangles. 

However, sketching the curves and circles right and accurately in isometric requires some knowledge in how those lines work. A circle is not a 'circle' when you need to draw them isometric. The circle becomes an 'elipse'. In Fig. 5, you'll find a tutorial on how to draw an 'elipse' using a pair of compass.

In step 4, you'll first need to learn how to draw Isometric 'Circles' from all surfaces off a cube. Then you'll learn how to draw curved edges along the corner of a block, hence introducing round edges. Its a very important drawing skill to learn since most of the products you design and make will have 'rounded' edges for added aesthetics value. And here you learn to draw them.


Steps:
  1. Begin by drawing a CUBE, 50mm each side, in the middle of the page.
  2. Practice drawing 'circles' (elipses) on each of the surface of the cube. A step-by-step example on how they can be done can be found at the bottom left of Fig. 5.
  3. Now that you are able to draw elipses efficiently on all sides of a block, you are ready to draw either a vertical or a horizontal cylinder.
  4. To draw a VERTICAL CYLINDERduplicate the elipse on both ends, top and bottom, on the surface of a tall block.
  5. After that you'll join the two outer most edges of the circle from top to bottom with vertical lines to form the edge of the cylinder. And you have a vertical cylinder.
  6. Note: To do steps 4 & 5, you need to construct the guidelines (see point 2) for drawing an elipse two times on the bottom surfacea and the top surface before you draw in the elipse.
  7. Do the same for a HORIZONTAL CYLINDER.
  8. To draw a CONEis extremely simple. First you draw an elipse at the base of a cube, or at the base of a tall square-based block. At the top of the square surface, split it in to square quarters. You will find a 'spot' in the middle of the square where the lines intercept.
  9. Next you join the lines from the 'apex' (the tip of the cone), downwards to the outermost left and right edges of the elipse at the bottom.
  10. Slightly more advance, you can draw a 'FLAT-TOPPED' CONE. The principle is the same as drawing a cylinder. When you draw a cylinder, say, your toilet roll, the top and bottom diameter is the same. However a 'Flat-topped' cone is like your regular cylinder, just that the top elipse is smaller. Once you draw the top elipse smaller than the one at the bottom and join them up like drawing a cylinder, you have a 'Flat-Topped' cone. Simple. You can now draw an inverted 'Flat-Topped' cone if you want. This time the base is the smaller elipse.
With all these skills you have learnt this far, you can create cylinders or cones, or simply blocks on top of a block or a cylinder and cylinders and blocks at the side of the blocks all over place. Draw them big and small. Combine shapes to make weird looking ones. 

You can also draw 'internal' holes of different shapes. Those 'internal' holes can be through holes, i.e. the hole goes through the block. Or the 'internal' holes can be a 'recess'. That means they stop at a certain distance from the surface creating a 'flat' hole, of whatever shape you can draw.

Make use your ability to draw elipses efficiently to introduce curves to the edges and corners of a block to make them look 'rounder'.

Use your creative licence to create objects you see around you by 'combining' or 'subtracting' different shapes and forms into bigger and more complicated shapes and forms. In this way you are also 'modifying' and 'morphing' shapes and forms to create your final art work. This is how things are drawn.


----------------------------------------------------------------------------------------

Finally, practice and practice and practice. Make mistakes and figure out why your drawing looks funny. Work it out and learn from mistakes. Draw loads of stuffs. And soon with enough perseverance your drawing will start to turn out more like what you wanted them to look like.

Without practice and determination and loving it, even the best techniques and tutorials available could not help you come close to producing a decent drawing. So start sketching now. Do them in a sketchbook. Do lots of them. Have FUN.

19 January 2013

Research Outline & Research Techniques

"It's time to do research"

But everybody seems to be looking at each other, some looked blankly on the blank paper, some simply totally blanked - all wondering what to do.

It is very common for students to be in a situation where they want to do research but do not know how and where to begin? 

Some randomly looked for stuffs to 'stuff' them in the journal. Some simply followed their teacher's suggestions to find 5 pictures of these and 10 examples of that. Then 5 advantages for this, and 3 disadvantages for that, etc. Then when those works are done, you look at them, and one wonders what they are for. And neither can the students explain when you asked them.

Is this very familiar?

Very funny actually.

----------------------------------------------------------

Firstly, you will need to be very clear on where you are in the design process

Because when you are at different stages of the design process that will requires very different type of research methods and strategies and there are not one size fits all approach.

Secondly, you need to know what information you are looking for

Ask what specifically are you looking for? 
Ask what do you want / need to know?

Thirdly, you must know your objectives for looking for those information.

For example, knowing what you want to achieve with those information. 
Knowing what you need / want to understand. 
Working out what information you do not have (yet).
Working out what you do not know (yet) but will be important to know or have to. 
Knowing what you will be doing with all those information? 
Knowing how will you be using those information to achieve your objectives?

Finally, having worked all of the above out, you should be clear what you need now. 
Next you'll need to have a few strategies to get those information you need

----------------------------------------------------------
I just realized I have written on just about every strategy a student can use as research methods / strategies for any part of the design journal. They can be found in the links below.
----------------------------------------------------------

Having worked out the objectives, you can use any of the research methods below to fulfill your research needs. Every method yields slightly different results. 

You must understand how each research method works and their respective objectives before attempting any of them for your research. I believe in each of the methods stated below, you should find at least a brief introduction to their functionalities. You may be even find examples of how they are used. IMPORTANTDo your research with understanding.

Eventually ALL reseach will lead you to an identified Design Opportunity. And ALL subsequent researches will lead you to various solutions you are looking for and solving the issues you have identified.

----------------------------------------------------------
More Tips: 

Primary research will give you the best results in a research. e.g. Empathy research enables the designer to live in the shoes of the target user. To really live out the user's life for a considerable time to experience what it is like to be him / her. Only then will the designer most closely understand the NEEDS of the users. Other examples are observing / experimenting the product and experiencing it first hand. Anything that is done that gives the designer first-hand data and experience is primary research.

Secondary research on the other hand should only be done if primary research methods are not possible, or as a supplementary to primary researches. For example, in supporting the claims and evidences from primary researches. Examples of secondary researches are information obtained from internet researches, third party observations, records of surveys, extracting information from articles and journals recording facts and evidences.
----------------------------------------------------------

16 January 2013

What is S.C.A.M.P.E.R.

S.C.A.M.P.E.R. is a great idea generation technique. 

There is no former meaning to the word 'SCAMPER', because each letter is actually an acronym, e.g. P.I.E. = 'Pan Island Expressway'S.C.A.M.P.E.R. is made up of the first letter of 7 or more possible ways (see below) that the Idea Generator (that is YOU) can use quickly and efficiently to 'modify' or 'evolve' an existing solution into something else. Sometimes into a very radical ones. So when you see 'S.C.A.M.P.E.R.' it simply means its an Idea Generation technique / strategy.

In a nutshell, if you use each letter onces in sequence (or randomly), minimally your effort will enable you to create at least 7 different possibilites starting from just one existing idea.


Since many people 'claim' that they are lousy at generating ideas, the S.C.A.M.P.E.R. technique is there to assist the idea generator to generate more ideas quickly and more efficiently. The same technique can also be used for '^Design Improvements'.

To use S.C.A.M.P.E.R. you ask questions:

S    Substitute             
What could be used instead? What kind of alternate material can I use?

C    Combine               
What could be added? How can I combine purposes?

A    Adapt                   
 How can it be adjusted to fit another purpose? What else is like this?

M   Modify               
What can I adjust to better suit the intended needs or preferences?

M   Magnify                
What happens if I exaggerate a component? How can it be made larger or stronger?

M   Minify                     
How can it be made smaller or shorter? 

P    Put to other Use  
Who else might be able to use it? What else can it be used for other than its original purpose?

E    Eliminate              
What can be removed or taken away from it?

E    Elaborate             
What can be expanded or developed more?

R    Reverse              
What can be turned around or placed in an opposite direction?

R    Rearrange           
Can I interchange any components? How can the layout or pattern be changed?

Fig. 1 below shows an example of SCAMPER in action starting from an ordinary eraser and improving it using the technique.


Fig. 1 The S.C.A.M.P.E.R. technique to improve an ERASER.

..........................................................................................


Fig. 2 The S.C.A.M.P.E.R. technique to improve an ERASER. 
~(Class demonstration version)~


Ways to use the S.C.A.M.P.E.R. technique

Step 1: Decide if you would like to do it randomly, i.e. choose any 'letters' to begin and work towards exhausting all the acronyms, or you may want to just do it from the left to the right, or vice versa. You can even choose to just use one letter or a combination of a few. Whatever it is, the objective is to generate as many initial ideas as possible.

Step 2: For the selected acronym, say, beginning with S = Substitute, you may wish to make a list of things you can 'substitute' with. For example, think about what you can 'substitute' for the 'sleeve' that goes around the eraser and *make a list of them very quickly. You can substitute 'color', 'material', 'texture' or 'parts of the object with something else', etc. Finish every S.C.A.M.P.E.R. before you call it quits.

Step 3: Sketch the different 'mutations' as quickly as possible. Use various drawing techniques to achieve the best communication of the ideas.Sometimes 2D is good. Sometimes 3D is good. Sometimes drawing how each stage works is good. Be creative in the ways you present you ideas. Coloring may be good at this stage too. But do not go overboard. See Fig. 2 below for a classroom demonstration version.

Also do not be too caught up with the practicality of the solutions or the aesthetics of those ideas. It is perfectly alright to have a few ridiculous or out-of-the-world ideas but do keep them there for the sake of generating as many ideas as possible. We can always go back to those ideas later and either make improvements to them, or we simply elimiate them (or ignore them).

Step 4: Always remember to annotate your solutions. Make notes about them. Explain what is going on. Describe how the solution works. If you do not do that, the idea cannot be easily understood by someone else.

Step 5: When you are done with all the initial ideas and you should have lots of them, it is time to take a good look and highlight the good ones. Do not reglect the 'not-so-good ones' but try to see if you can further improve and refine them to make them work better. Use  S.C.A.M.P.E.R. all over again if you need on each idea. Start combining good features to create even more new hybrids.

Step 6: Selection and refinement. This will be for the Development stage.   


(*) For those those who think you cannot draw fast enough. You can first generate a list of stuffs you can modify from S.C.A.M.P.E.R. And later on you'll look at your list again, and you can proceed to sketch them out.
...........................................................................................


Some ground rules when generating ideas
1) Quantity is #1 over quality of ideas.
2) Suspend all judgement on functionalities and usabilities.
3) Maintain 100% survival rate for all ideas.
..........................................................................................

Some examples of how S.C.A.M.P.E.R. is be used can found 

here  (How to Use S.C.A.M.P.E.R. for Idea Generation (Concept Borrowing) and Development

and 

here  (How to Use S.C.A.M.P.E.R. for Combining Ideas and Further Refinements).

..........................................................................................

(^) reference: http://download.intel.com/education/common/en/resources/DD/DD_Session2_SG.pdf

Mastering Unfamiliar Themes: A Simple Guide to Kickstart Your Design & Technology Coursework

Embarking on a  Design & Technology (D&T) project can be an exciting journey but students often find themselves at a crossroads when...