Need Help?

Facing hurdles in design or sketching? As a student, do you grapple with balancing schoolwork and creative pursuits? This blog provides in-depth, tailored advice, directly tackling issues in design, sketching, and academic management. It's a place where you may find the necessary support and guidance to overcome these challenges. (Copyright © 2007-2024 Daniel Lim) Feel free to share the topics you're eager to explore in this blog. Additionally, if my content has inspired or aided you, I'd love to hear about it. Your feedback is invaluable.

22 September 2015

Secondary TWO 2015 Students' Reflection | Semester 2 | MechanicalBoatToy

Time waits for no man and we have come to the end of our second semester (2015) with a second batch of students doing lower secondary D&T. 

In this  semester, all Secondary 2 students design (well sort of) and make a mechanical (CAM Mechanism) boat toy. I planned the overall schedule and deliverables. In the Design Journal component, students researched various boat patterns, learnt to select, refine and make the chosen boat pattern to be installed on top of their mechanical toy structure. In the workshop component, everyone follows the steps I planned to make an identical main structure.
Students learn how to copy selected boat profile research line drawings into their Patterns Generation section. They learn how to copy a drawing from their sketchbook using techniques like identifying major shapes and use of negative space. Students then vote for each other the best fitting boat profile for refinement and development.


I could not be any more glad that almost every student learned to apply the drawing techniques and tips I taught them to finish up just 6 initial boat patterns for later considerations.
Fast forward to making. 2E3 students just collected their materials to make their mechanical toy boat box carcase. Here they do a dry fit and make sure all their marking on each piece of wood are in the correct orientation relative to each other. VERY IMPORTANT. What happens after this is we move to the back of the classroom to the workshop where I demonstrate how to fix a wooden carcase.

Snippet of some instructions I put up on the whiteboard. This little offset 12 mm diameter hole is a tip we learned from a design and technology website that suggested the follower is preferably not directly above the axle of the cam. And so we learned to apply this idea. The final product does worked better.


Everybody looked forward to bringing their mechanical boat toy product home except one with a thumb down. He didn't like his own workmanship. I say more practice and you'll be better next time. Anyways finally the students bring home their creation.  

Above: 2N2.


Above: 2E3.

For the BEST D&T Student from my class.


I made two toy cars out of leftover parts. Lovingly waxed to be given to two top students of each class I teach. Presented to each of them on the second day of script checking on 12 October 2015. Hope they liked it.

Reflections from 2E3 and their experiences with me.


Reflections from 2N2 and their experiences with me.


This is our second and last day (12/10/15) for checking examination scripts and 2N2 had two periods with me. I gathered all the leftover scrap pieces from the mechanical toy project and we made mini wooden toy cars out of them. I can tell you they are a bunch of happy lots. 

Secondary 1 Semester 1 Boat Pen/Pencil Holder Project students' reflection HERE.

21 September 2015

A note from a student. Semester 2 (2015) D&T

A note by a semester 2 (2015) D&T student:

'mr lim has thought us much valuable lessons fr our character development. firstly, he taught us to put in our best effort and focus in what ever we do. he was patient with us. if we dont understand his instructions and he would willingly repeat it to us in a more detailed manner. he thought us to take initiative to do our works and also make sure that we did it to the best of our ability.
secondly, he thought us to look at things in a different manner and step out of our comfort zone. we usually try to do things in the way we feel most comfortable at, but mr lim enabled us to be daring and try to do things in a different way. he thought us that, thr are many ways of doing things. overall, mr lim is a great teacher!
-(name taken out, class taken out)'

~ Thanks student. mrdanielsos ~

20 September 2015

An Appreciation Letter From an Educator from Cape Town (2015)

~ This email came in early 2015.~

"Dear Mr Daniels

I am a Visual Arts teacher with decades of experience....It is extremely difficult to get resources or help, so I wish to thank you for your amazing web site / blog!  I have just discovered it and you have saved me :)))

I will be making my own videos and will share them with you if you re interested.  I am also an ICT integration specialist and believe strongly in acknowledging copyright and sources. I can assure you that I shall include your URL if I am inspired by your work.

A BIG thank you!

Kind regards

...
Visual Arts Educator
Design & Technology Educator
ICT Integrator
"Apple Distinguished Educator"

A Thank You Letter from a student from Mauritius.

~ This email came in on 15 February 2015. I've decided to share this nice letter to everyone. To encourage those who think you do not have good support or lacked resources to do well, there are always avenues you can excel and produce quality work. However at the end of the day, your decision matter. A decision to give yourself a chance to produce work to the best you can. This student signed off as 'NSF Dev' did not have the privilege of have me in person to explain to him concepts or to guide him in his coursework. But nevertheless he helped himself and was happy with his efforts.~

"dear mr.daniel,
 
i was not actually a design and technology student, instead i was studying design and communication(o-level). it's like a derivative of design and technology, i don't know if you know the syllabus, but it was quite similar. i am from mauritius.
almost every student took private tuitions especially for coursework. but i did not. lawl.
there was a lot of peer pressure but i still did not.
fortunately, approximately 2 months until submission, i found your blog. your blog was like my tuition but online. getting tips and all that. i had to fork some things due to the different syllabus but it was still very very very helpful. i read nearly all related posts and files related to things i was looking for. thanks to you, i went back and edited all previous segments of my coursework with your tips and suggestions(we can do our coursework on pc here btw). i realized all the missing critical parts i did not know of thanks to you.(especially on research and analysis, and ideas.).
guess what...i scored an A. an A!! not being mean but that's better than 80%  of the dudes who took tuitions. lawl. there were 3 who scored an A* though. who cares. ok maybe you will since you're a teacher. shoot.
i'm now 17, doing my last two years at school(a-level). although now i dropped design and technology(it becomes d&t for a-level). now, i'm studying computer science since i love computers and there is no coursework and it's less bulky. yes i'm lazy.
anyway, i guess i won't be visiting your blog now. and i guess you won't be reading this pointless e-mail. and knowing how you indirectly made a student score an A.
THANKING YOU,
ex-design and communication student from mauritius who just remembered you from looking at his "design stuff" folder on google drive."

~ Dear NSF Dev, I am very encouraged by your letter and more excited about your achievements.You did a great job. mrdanielsos ~

03 September 2015

General Testimony from Class Level D&T and Project Work Experience with Mr Daniel Lim


I facilitated this class for Project Work in the first semester of 2015. Teaching and coaching the class using design thinking processes for their group project had been quite an experience. Approaching project work systematically in broad design steps reduces the entire project task to clear and manageable bite sizes. Groups were given full autonomy when it comes to decision making to ensure authenticity in the final product. In the second semester, half the class ended up with me for their Design & Technology subject. 

Cannot run away from being assigned another two project work classes in the second semester 2015. This 1E3 class is bright, bubbly but cannot stop talking. I am humbled they learned something from the facilitation especially in the generation of possible practical ideas and fine-tuning of their milk carton boat design. What I liked best was the decision to get every group to work on a single sheet of mahjong paper from the initial design stage to the subsequent stages of modification and improvements. The interaction, iterations and discussions generated through and fro from the recordings on paper and their physical prototype is phenomenon. I have photos of them but wait till I find them I'll post it here. Watch this space.


I'm happy and also humbled that my students get amazed when I teach them. I believe in staying true, honest and steadfast in the facilitation of the Design & Technology Coursework.

04 June 2015

Design & Technology Awards Ceremony 2015 - My Works | My Contribution

DESIGN & TECHNOLOGY 2015

Valuing Design Education: Visual, Story, Sketch, Solution

4 June 2015 (Thursday) @ The Marquee @ Science Centre Singapore

The A-Team for the event. I'm the one seated at the far left. 
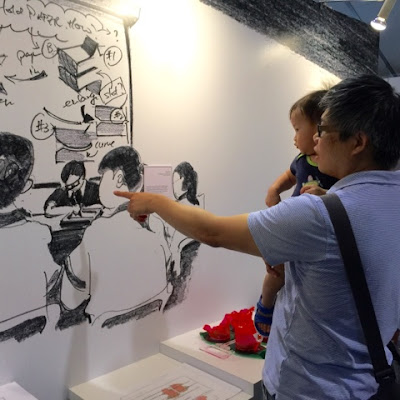
All the full wall design related sketches you see in the following photos as well as in the publication are drawn by me.

The entrance banner.

The Hall Entrance (Poster)

Sketches made it to the Tote Bag as well.

Happy me.

One of my draft that made it to the final design.

Publication (Cover)


Publication (iInside)
Publication (Last Page)

Some full wall feature sketches.

Some full wall feature sketches.

Some full wall feature sketches.

My Funny Little Fella visited the exhibition on the last day.

Showing Funny Little Fella around and telling him what those sketches mean.

It's not complete if Funny Little Fella did not test if the products on display worked.

Funny Little Fella borrowed a ball from the exhibit.

Hi Five to the coolest dude.

Ended our visit walking around in the Science Centre. Mdm Chia caught up with me just to give me a piece of the directional posters. Funny Little Fella badly wanted to help me carry.

21 May 2015

Secondary ONE 2015 Students' Reflection | Semester 1 | Boat Pen/PencilHolder Project

Secondary ONE students get to design and make an Boat Pen/Pencil Holder for Semester ONE. I had two classes, 1E3 and 1N2. Here are some of the things they say about the class.

Reflections and Testimonies from 1E3:


Reflections and Testimonies from 1N2:

Student Boat Pen/Pencil Holder Projects and camera shy students.

Secondary 2 Semester 2 Mechanical Toy Boat Project students' reflection HERE.

26 February 2015

Idea Generation Techniques - Which and When to Use?

1) For 'N' and 'O' Level students looking for the complete Design Journal self-help links please click here or scroll down to "Design Journal 2015 | Complete Set of Post links for Design Journaling from Beginning to the End".


3) Click 'here' for "Secondary ONE - 2015 - Design Journal - A Pen/Pencil + Note Holder".
------------------------------------------------------------------------------------------------------

In the Singapore Design & Technology Syllabus, there are a few Idea Generation Techniques mentioned and taught from the textbook. They are
  1. Attribute Listing.
  2. Morphological Analysis.
  3. Relay Thinking.
  4. Shape borrowing (found in the lower secondary textbook).
  5. The S.C.A.M.P.E.R. technique.

I will not repeat what you can find online or from the textbook on what they are and how the various techniques can be used. But you'll find my 'reviews' on the techniques of which I hope you can end up making a better choice on which and when to use for your coursework. 

Avoid the one method fits the whole class pitfall. e.g. everybody use 'shape borrow' or everybody use 'morphological analysis'. Every project is unique and should be approached with the most appropriate techniques. This is the same with choice of 'research' and 'decision making' techniques throughout your design journal.

Back to Ideas Generation Techniques Review:

(1) & (2)  Attribute Listing and the Morphological Analysis
I am not a fan of both Attribute Listing and the Morphological Analysis as I find them producing very mechanically random 'fast-food' styled outcomes. Though you can use them to produce hundreds and thousands of hybrid ideas which are just a little different from the next, they are not useful for the unmotivated and lowly engaged students. The morphological and attribute listing technique both require highly motivated and engaged students to evaluate, synthesize and make meaning out of the various random outcomes - which many are either not ready for the required thinking efforts that comes after or they simply do not have the caliber to wrap the ideas up into something more practical for refinement.

However it doesn't mean you avoid them. You can use them in the beginning to generate some initial ideas to kick-off the process especially if you do not know what to do and which ideas to begin with. By all means make use of the two techniques but you must understand the respective functions and what outcomes you are expected to end up with.

(3) Relay Thinking
This method of idea generation is fun and it is collaborative by nature. It is useful to gain new insights and perspectives from your friends for your project and to find out what other interesting ideas may evolve from your initial ideas they can think of which you did not. At the end of the session, you can then evaluate and select potential ideas or concepts to be included in your Ideas Generation section. 

(4) Shape Borrowing
This is perhaps one of the most commonly used technique for the lower secondary projects. It is very widely and effectively used in real world design examples where great products are outcomes from borrowing shapes, forms and functional concepts from nature. This technique is great - if you know what it is for and what you will be getting out of it. Otherwise this process if attempted will be as mechanically meaningless as the first two techniques I mentioned above.

The shape borrowing technique can be used for the following outcomes in your project (or product):

You can get inspired by shapes/forms + function fitting [more correctly 'by nature' (animals, fish, insects or plants, any objects, etc.)] for their first principle functionality application.

Example 1: A bottle opener project. Inspired by the beak of a parrot and/or the like. With an end-product that resembles the functional shape of an inspired source - the 'hooked' beak as a leverage to pry open a bottle cap.

Example 2: Getting inspired by the construction site's piling machine. The action of 'piling' columns in the ground seems to fit the idea of a heavy rod slamming on my walnut / almond nut. Then think of what other objects or from nature that uses something to crack nuts or crack open anything.

Example 3: Getting inspired by the shape of a Beetle to an end product, say to the profile of a new car design - form fitting that meaningfully resembles the inspired source. Perhaps for aerodynamic properties or just simply aesthetics or the like.

An example of a shape borrowing project can be found by clicking 'here'.

One example of shape borrowing gone wrong is to fit a supposedly inspired shape to a potential product that does not have an obvious relationship. I am talking about 'meaningfully' inspired applications here. Think about this, how about an 'inspired' dolphin form as a coin box? How do you relate a dolphin to money? coin? storage? Weird isn't it? It will make a perfectly functional container but that is all you can say about it. You cannot tag along the following keywords on that like 'innovative', 'fun' 'interesting', 'novelty', 'funny', etc. It is a plain boring functional product.

(5) The S.C.A.M.P.E.R. technique
The S.C.A.M.P.E.R. technique is good for 'creating' your first idea and evolving that single concept into other hybrids or something else better later on. Used with varying level of details, the technique is excellent both for Idea Generation (S.C.A.M.P.E.R. used loosely at a macro level generating new raw broad concepts freely) as well as for Concept Refinement (S.C.A.M.P.E.R. used at a micro level focusing on generating options from confirmed concept parts and working towards final decision making as a whole).

I leave this technique for the last because if you really understood what this is,the S.C.A.M.P.E.R. technique covers (almost) all other existing techniques (including the others mentioned above) you can find. Maybe I should just sayALL other Idea Generation techniques falls under part of or a combination of the S.C.A.M.P.E.R. acronym.

Have a quick look:
  • "Attribute Listing" falls under mainly "Substitute". And as well as one or a combination of the following: "Combine", "Adapt" and "Modify".
  • "Morphological Analysis" falls under mainly "Substitute" & "C = Combine". And as well as one or a combination of the following: "A = Adapt", "M = Modify".
  • "Shape borrowing" falls under mainly "S = Substitue". And as well as one or a combination of the following: "Combine", "A = Adapt", "M = Modify", "P = Put to other use" and "R =Reverse/Rearrage".
  • The S.C.A.M.P.E.R. technique is everything above and includes explicitly "E =Eliminate" which is not part of the activities in the other techniques. How the S.C.A.M.P.E.R. technique can be used meaningfully can be found by clicking 'here'.

Conclusion
So, that wraps up my opinion and views on the various (textbook) idea generation techniques you will come across sooner or later if you chose (or did not choose) to do Design & Technology. 

Idea generation is a fun process. The process is addictive. I can loose sleep and food over this.At the same time, many students who are put off when they arrive at this stage claim that they have no idea, can't draw and/or don't know where to begin.

In order to be having the kind of fun and addiction in Idea Generating, it is necessary the idea generator
  • should have a reasonable level of sketching competency (technical competency)
  • is comfortable and fluid in his idea generating ability (cognitive competency) and 
  • wants to produce quality work (positive emotional presence). 
There are various drawing techniques and practices you can find in my blog as well as on the Design References label on the right hand side of the blog page which you can self-teach and practice. 

Your ability and confidence in generating ideas and communicating them through clear and readable sketches (and annotations) really depends on your willingness to upgrade you competency in drawing. There is no way you can achieve that without practice.

Finally, grow to like (if you did not) what you are doing in Design & Technology - especially to those who did not choose to do this subject or just found out that coursework requires a substantial commitment, effort and time to complete. I say so because I have met too many in my experience. 

To correct what I said about needing substantial effort and time required, if you (a) knew the design process well and (b) commit yourself in the beginning to identify a genuine need (or problem) that requires a solution, you will be able to complete the remainder of the coursework with minimum drag. You also have less of your teacher needing to bug you to produce work. 

The design process for your coursework is no rocket science. It's how everyone of us think everyday. We have a problem or a challenge (Design Need and Situation), we find solutions (generate ideas), we refine our solutions (develop the idea) so that it can eventually be made and put to good use (Realization, evaluation, testing and improvement).
------------------------------------------------------------------------------------------------------


P.S. Let me know if the information is useful or that you have been helped. Feedback and your opinions welcomed.

22 January 2015

Secondary ONE - 2015 - Design Journal - A Pen/Pencil + Note Holder

1) For 'N' and 'O' Level students looking for the complete Design Journal self-help links please click here or scroll down to "Design Journal 2015 | Complete Set of Post links for Design Journaling from Beginning to the End".

2) Click 'here' for Secondary ONE - 2015 - "A (Simple) Wood Note Holder (Starter) Project" & Drawing Practice.


.........................................................................................................
Dear Secondary ONE students, 

Read on and you will find classroom slides, steps and guides to complete your Design Journal. 

Regards
mrdanielsos
.........................................................................................................

NOTE: Students are not given printed templates. All images shown are classroom slides. Students copy (when necessary) and complete their work in A4 sketchbooks which is now called a 'Design Journal'.

We began with a design brief.  A design brief is a concise statement that spells out clearly  what the project is all about. 

You were given a partially completed Design Brief (Fig. 1) to fill in the number of pens or pencils you wish the holder to store and where you intended to use the product. Note that the maximum number of pens / pencils is kept at 3 for this project.

Fill in the number of pens and/ or pencils you wish to have. You are also required to provide reasons for your decision. These reasons that you provided are actually the Design Need & Situation which comes before the Design Brief. Note that not all classes will need to complete Design Need & Situation.

Fig. 1

Next we had an example in class where we had to plan a class outing to East Coast on one of the afternoons. We talked about the things we need to consider as a committee like considering the weather, what to bring, what to do, about the transport, etc. 

Then we apply the same logic, change our objective and say, "Now we need to design and make a pen/pencil holder, so what are they things we need to consider?"

So we get, "We need to consider how many pens / pencils to store, the materials that we have, how much time we are given to make the product, do we have a budget for additional features, etc". 

Each of these points make a factor to consider. (See Fig. 2). Before you begin to make a list of consideration or constraint factors, I find it useful if you would 
  1. recall your design brief and then 
  2. begin with "I must consider..."
For example,

"I need to design and make a pen/pencil holder, I must consider...". 

Fill in the blank with 'I must consider - function (i.e. what will the product do), users (i.e. who will be using the product?), cost (i.e. what budget constraint do I have?), etc."

Note: A constraint is a factor that are limitations imposed on a project. For example, time is a constraint because we have to work within a certain time frame to complete the product.

You may refer to Chapter 7.4 Design Considerations in your textbook for better understanding of what we are doing here.

Fig. 2

Fig. 3 below shows an extension of the above activity. Once the relevant statements are written down for every factor that you have listed, it will be good for you to start 'answering' some of those. Extend your mind-map and write those 'answers' in as shown in Fig. 3.

For example, 

Function - What will the product do? Answer: The product needs to store 2 pens and 1 pencil. And some space for empty pieces of post-it paper.

Once you complete this stage, writing your list of Design Specifications next is a breeze.

Fig. 3

Read Chapter 7.5 Design Specifications before the next lesson. 
If we have a two period lesson next, the other half I'll teach you drawing skills. 


That is all for now. More updates later.

Mastering Unfamiliar Themes: A Simple Guide to Kickstart Your Design & Technology Coursework

Embarking on a  Design & Technology (D&T) project can be an exciting journey but students often find themselves at a crossroads when...