Need Help?

Facing hurdles in design or sketching? As a student, do you grapple with balancing schoolwork and creative pursuits? This blog provides in-depth, tailored advice, directly tackling issues in design, sketching, and academic management. It's a place where you may find the necessary support and guidance to overcome these challenges. (Copyright © 2007-2024 Daniel Lim) Feel free to share the topics you're eager to explore in this blog. Additionally, if my content has inspired or aided you, I'd love to hear about it. Your feedback is invaluable.

27 June 2012

Oblique Drawing to One-Point Perspective + Isometric

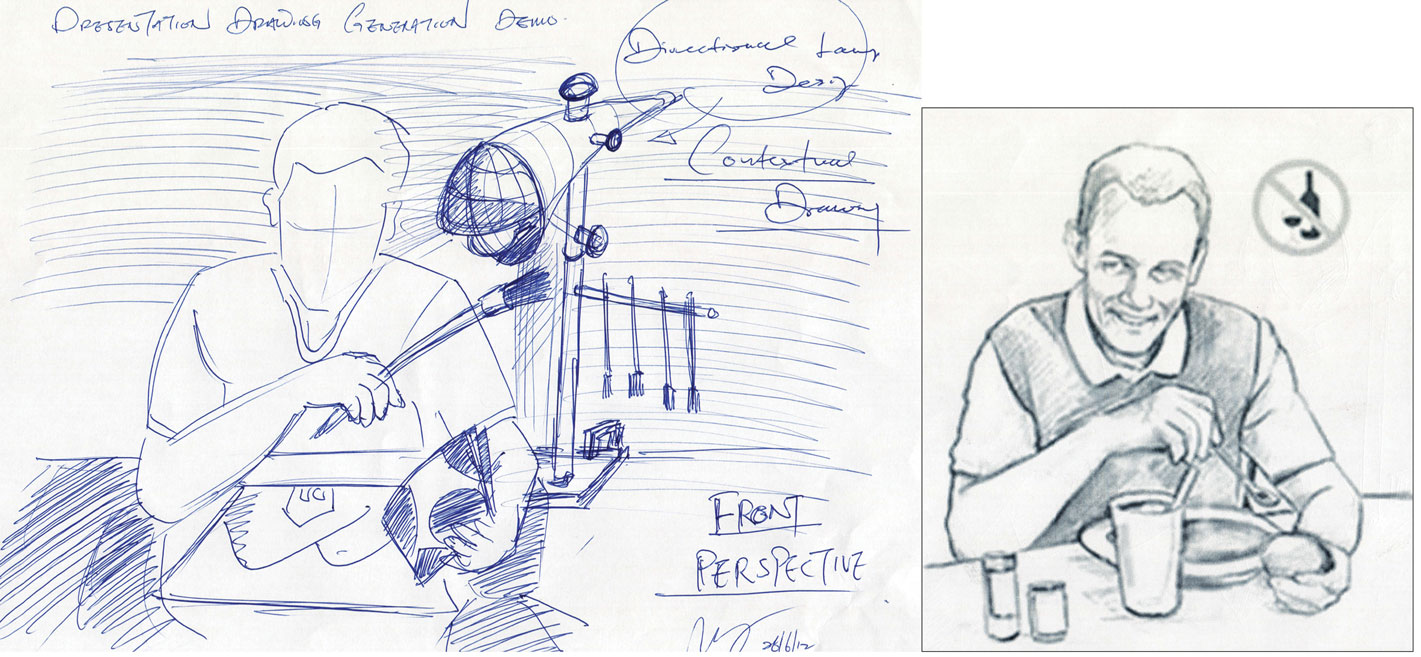
First lesson for 2N1 and we are left with 15 minutes. So I did a little bit of introduction to Isometric Drawing with everyone starting to draw. Last year, I taught the same group of students how to draw in Oblique Drawing so that they can use the same technique to present their final product for submission. This year I will be introducing them the Isometric Drawing Technique. A slightly more realistic drawing technique compared to the Oblique Drawing Technique.

Next, the relation between the Oblique Drawing and the One-Point Perspective.

The interesting thing is this, a One-Point Perspective Drawing is derived from a slight deviation from an Oblique Drawing. Both still have the same full 2-D front view of the object. The only difference in a One-Point Perspective is that its 3rd dimensions are drawn aligned to a POINT (wherever the artist wish it to be). The 3rd dimensions of the Oblique Drawing are simply projected at 45 degress parallel to each other. In the One-Point Perspective Drawing, when the 3rd dimension lines are drawn towards a POINT, what you have created is an illusion that objects further away looks smaller! Therefore it looks more realistic than the Oblique Drawing.

Which is better?
For the sake of comparison, as mentioned before in class the Isometric Drawing is a better option in drawing than an Oblique Drawing because the Isometric Drawing represents the real world better. Instead of parallel 3rd dimension projections, the isometric is 30 degrees off the horizontal for its 2nd and 3rd dimension. If that is the case, so it seems like the One-Point Perspective drawing is a good competition to the Isometric Drawing as far as 'realistic' representation of an object is concerned.

Well yes and no. though the One-Point Perspective does presents objects in a more realistic 3D manner (like the Isometric Drawing), a straight-forward 2-D front view to begin with still does not represent the real world very well. Take a look at objects around you, do they all appear perfectly 2-D in the front? However, the One-Point Perspective Drawing is still widely used in Interior Designs and Architecture presentations of the designed environment because they do look good if well drawn.

An even more realistic drawing technique will be the extension of the One-Point Perspective - also a slight deviation from an Isometric Drawing - It is called a Two-Point Perspective Drawing. The Two-Point Perspective Drawing is not shown in the example above but you may find it in many of my previous posts within my blog.


Alternatively you can also watch a video showing the 4 main types of drawing techniques I talked about in this post.

Just in case you are very keen, the final type of drawing technique makes use of three points and you call that a Three-Point Perspective Drawing. Ever watched Spiderman on TV or read any Marvel Spiderman Comic Book with 'Spidey' swinging from the top of the skyscrapers and the camera view showing all the actions from the sky down? Did you notice how the buildings looked like? That is a combintion of One, Two and Three Point Perspective. Cool isn' it?

The more types of drawings you learn, the better you will be in selective the best presentation style. All drawing techniques ranging from Oblique to Isometric, extending to One-Point and Two-Point Perspectives (and even Three-Point Perspectives) can be used equallly effectively in your idea presentation. But you need to know each of their differences, their limitations and their strengths so that you can apply them meaningfully to capture the idea you want to present.

Here is a FIVE-POINT Perspective tutorial link if you are REALLY REALLY keen. It is pretty easy to understand what is going on in the tutorial. Below is my very first attempt at 5-Point Perspective Drawing much later during my free time.
5-Point Perspective (Fictional) Commercial Area Sketch

Let me know if you have questions.

26 June 2012

Presentation Drawing in Drawn in Sub-Context & in Context - With Human Figure Interaction


Another example of a sub-contextual drawing (LEFT) making use of an image resource (RIGHT) from the internet. Note I do not draw the face. I like to leave it 'faceless' so that the figure can represent anyone.

To do this, I made use of the image resource, place a piece of paper over it to trace the main elements and omit the unnecessary parts. Alternatively you can use your reference to 'redraw' it on a new paper. Finally draw in the product used in its context.

Note that all drawings should present the same perspective.

The example above is a step better than the previous. The presentation is not only drawn in context - you can easily recognize a home (or a room) with the addition of the window and curtains in the background. To enhance your presentation, you should also consider include some shading or coloring.

Working Drawing Components


A Working Drawing has the following usual components:
  1. An Isometric Drawing showing the Part Numbers (or Part Labels).
  2. An Exploded View (or Assembly Drawing) showing where the parts go and their fixtures.
  3. An Orthographic Projection (First Angle) showing the overall and necessary minor dimensions.
  4. If you can afford space for Part Drawings or useful Sectional Views to be included, go ahead and do so. Otherwise you must at least have those in of your development phase. Just think about the part drawings as a summary of your conclusions on the physical product project. Showing all the details, positions, trim lines and dimensions. (Note: Production Sequences and a Gantt Chart Production Plan need not be present in your presentation boards, however they MUST be included at the end of your development phase.
  5. A Material List showing all the Part Numbers, the Materials used, the Dimensions and the respective Quantities.
Some Tips and Pointers:
  1. Isometric Drawings: If the product has several components, especially those with components within each bigger component, you may consider drawing those components and label them seperately. It is impossible to draw all of them within (with lots of hidden lines) and attempt to number them off. That will be VERY messy and impossible to read. Finish off with a neat Exploded Drawing to show how each components come together.
  2. Exploded Views: As long as the parts are aligned consistently (Isometric or Oblique) your exploded view should look neat. Not all parts can be aligned straight to its connection point. In this case you can draw your component slightly off, but use lines to create a 'path' to lead it to the connection point. The example above has everything aligned. For an 'off' example click here. In the linked example you will find a dowel that is not aligned.
  3. Orthographic Projection: Leader lines should not touch the main drawing and should have a lighter line weight than the object. A good guide would be at least 10mm away from the drawn object. Spacing between dimension lines to the next should be consistent. A good guide would be at least 5mm away from the drawn object. Dimensions are usually written 'on' the dimension line. For vertical dimension lines, the dimensions are usually written on the left of the line following the orientation of the line.
  4. Material List: Most common mistake is the written dimension. Lenght = the longest or the largest dimension. Followed by Width and the smallest dimension is the Thickness. It is worthy to note that numbering in the material list goes from '1' from the base up.
  5. Do give a name for your project to be included as a 'Heading' for your Material List. Rather than "Material List' as your heading.

14 June 2012

D&T Coursework & Theory Plan for July and August 2012


'N' Level Deadline : Term 3 Week 8    : MONDAY   : 13 August 2012
'O' Level Deadline : Term 3 Week 10  : TUESDAY  : 28 August 2012

Part A: Design & Technology Theory
  1. All Subject Contact Time (SCT) periods will be used for theory practice. 
  2. Bring all your past year questions.
  3. Priority will be given for students with questions and I will address those questions during SCT. 
  4. You may ask or discuss questions on any topic ranging from design to technology. 
  5. Questions can be coming from past year papers, or any topics that require clarification or to be elaborated, etc.
  6. If I receive no questions, then we will attempt the questions from past year papers in sequence.
Note

  • 5NA SCT : Term 3 : Week 1 to Term 3 Week 7 : Friday,  2pm to 5pm.
  • 4NA SCT : Term 3 : Weeks 2, 4, 6, 8, 10         : Monday 2.30 to 3.30pm.
Part B: Coursework
  1. All official classroom session will be used for completion of the three Presentation Boards and fine-tuning of your design journal ONLY. 
  2. If have not completed your product for some reasons you can only do it after school.
  3. All drawings in pencil drawn to scale according to standard drawing convention. All drawings inked in black once confirmed by teacher.
  4. Complete your Working Drawings and Presentation Board components in the workshop (with the help of the Instructors when I am not around)

Term 3 Week 1 & 2
  1. 1 x Part Lists (in Orthographic + Dimensions for every part)
  2. 1 x Isometric Drawing (no dimension + no label) - Showing Overall Product, i.e. everything in. e.g. if study desk, then draw the desk together with the drawers)
  3. 1 x Isometric Drawing  (no dimension + no label) - Showing Individual sub-Parts. e.g. if study desk, then the desk without the drawers + and another set drawers only).
  4. 1 x Isometric Drawing (+ Part Numbering) - Showing Overall Product, i.e. everything in. e.g. if study desk, then draw the desk together with the drawers)
  5. 1 x Isometric Drawing  (+ Part Numberingl) - Showing Individual sub-Parts. e.g. if study desk, then the desk without the drawers + and another set drawers only).
  6. 1 x Material List

Term 3 Week 3 & 4
  1. 1 x Orthographic Projection + Dimensions (Showing Overall Product, i.e. everything in. e.g. if study desk, then draw the desk together with the drawers)
  2. 1 x Orthographic Projection + dimensions (Showing Individual sub-Parts. e.g. if study desk, then the desk without the drawers + and another set  drawers only).

Term 3 Week 5
Using the Isometric drawing drawn in week 1:
  1. 1 x Exploded View(s)
  2. 1 x Presentation drawing in contextual use

Term 3 Week 6
  1. 1 x Presentation drawing in contextual use complete with rendering

Term 3 Week 7
  1. Fine-tune Design Situation, Design Brief, Design Specifications
  2. Presentation Boards Complete.
  3. Product Prototype Fine-Tune and Complete.
Note
  1. I will not be in school during Term 3 Week 2 & 3. 
  2. During these two weeks, all students to follow plan above in the workshop.

11 June 2012

D&T June Holiday to August 2012 Coursework Assignments

Every point below is IMPORTANT:

D&T JUNE Week 3 & 4 2012 Coursework:
  1. Come to the workshop during Week 3 and 4 of the June Holidays ONLY if you are touching up your coursework, otherwise stay at home.
  2. For working drawings, you must study your textbook on how to do each of them correctly before you start yours. That includes how to draw different types of lines (e.g. difference between dimension lines and product lines, etc., how draw to scale, how to dimension correctly, etc.
  3. Come back to school in July with the various types of drawings required in a working drawing completed. I’ll then give you feedbacks on your works to guide you towards submission standards. In some cases you will need minor changes. In other cases you may need to re-do. That depends.
  4. Update and stand-by your material list somewhere in your design journal. Do not bother to decorate it! You will eventually need to produce another one with just the right size for you to insert in your Presentation Board.
  5. Complete one A3 size Presentation Drawing (draw in contextual use).
  6. Do not ink your drawings yet. You will only ink them when the school begins in July and after I have seen your drawings. Inked drawings will be used for photocopying and scaling, etc.
  7. All drawing guide lines must be light and soft to facilitate erasing in case of mistakes. Always use guidelines to draw your project.
D&T JULY to mid-AUGUST 2012 Coursework In-Class:
  1. 2012 July – Completion of all Working Drawing + Presentation Drawing components for Presentation Boards.
  2. 2012 August – Design Journal Component (P&M, Research, I&D) Touch-Up + Written Theory (Design +3 × Technologies)
D&T JULY to mid-AUGUST 2012 Coursework After-Class:
  1. 2012 July – Product Prototype Completion + Touch-ups.
  2. 2012 July to August – Design Journal Components + Presentation Boards Components Touch-Ups.

08 June 2012

Reflections for the June 2012 Holiday 2 Weeks D&T x'TRA Sessions + Week 3 & 4 "SUPER-x'TRA"


June 2012 Week 3 and Week 4 "SUPER-x'TRA" D&T Session Attendance Sheet


I used to have more time in June to enjoy more of going out for afternoon coffee with a book. Or coffee and sketching everything from new product designs, or of any stuffs I can see. Look out for cool design stores I can bring my students to visit in the future. To find new hardware places my students could go. Or coffee again to think about D&T, to reflect on the processes, to think about how I can teach it better, to think about how I can help my students to understand and learn better, more fun, more cool, more interesting, more innovative, more satisfying. Or to fiddle on my iPad on new ideas for teaching, new mind-maps on design which I can share with my students when I see them. Explore new softwares or apps which I can use to teach. Explore new websites I can include alongside with the many I already have in my design blog. Or do street or nature photography etc...


Now it's much less...

June holidays are crazy periods. Not crazy about going out for holidays or chilling out in the cafe reading or sketching though. But crazy with students after students for consultations, for specific instructions on every 'hows' you can imagine starting from explaining and demonstrating the most basic processes to the most complex; and demonstrating the most basic drawing techniques to the most complex structures.

Similar to the last three years, this first two weeks of the June holiday was spent with my students from 0800hrs to 1700hrs (with an hour lunch from 1200-1300hrs). More extensive and intensive than all the busiest school term days combined.  Now I am offering to extending the sessions into Week 3 and Week4, which I call the "SUPER x'TRA" because I see there is a need to. But I wonder if my students see the same need.


As a side note, just after you all left the workshop today, Mrs Wong asked me if both of us would take turns to come back during Week 3 and 4 to help those who need. I was so touched. And I thought these students are just so blessed...

If my students had worked more consistently. If my students had come back more regularly in the afternoon to be helped. (I had 8 full weeks of afternoon consultation schedules before June but they were hardly filled up. Even if they were booked, there were most likely, as-if, 'forced' into making a reservation because I made it a requirement for them book at least once every fortnight). If my students had listened to me, read my posts, studied and applied them diligently, there will be lots of questions that could have been resolved, there will be less mistakes they will make. If... 

Hopefully, when we arrive at July and August. There is no need to look back and say on the day of submission 'I could have spent more time. I could have been more diligent. I should have known this and that, I should have taken more initiative to...'.

Students you only have ONE life. One opportunity to do D&T. One opportunity to get the best grade. Make the best of 'NOW'. 

I hope your 2 weeks in June with me and the Instructors (Mr Lim and Mr Ho) were well spent. Do not forget to thank the instructors. Hope you did catch up with what you missed during the school term. We have all worked hard. We have all sacrificed our holidays. I just hope to see that the time and sweat that was spent will bear sweet fruits in the end. 

Week 3 and 4 June Holiday "SUPER x'TRA" sessions will be based on appointments only. I reserve all the rights to accept or reject any appointment. 

Send your request for my presence via email (mrdanielsos@yahoo.com.sg) 
or message me thought FB at least two days in advance. 

Priority for consultations will be given to the ones who made an appointment with me. 

Remember to sign in and out.

Do you have the same hope and aspiration?

Mastering Unfamiliar Themes: A Simple Guide to Kickstart Your Design & Technology Coursework

Embarking on a  Design & Technology (D&T) project can be an exciting journey but students often find themselves at a crossroads when...